How Does Embroidery Work?
In this digital age, embroidery is done using advanced software and high-tech machinery. The following takes place to create embroidered promotional products:
-
- Step One: A design, logo, or any other artwork is scanned and loaded onto a computer to be Digitized.
- Step Two: An operator presses a frame around the imprint area and inserts the fabric under the needle in the machine.
- Step Three: A mechanized needle goes across the material at a rapid pace, putting each stitch into place.
- Step Four: Each thread color is stitched individually until the logo or design is complete.
- Step Five: A technician snips off any excess thread and checks for inconsistencies in the embroidered design.
- Step Six: The end result is a raised, textured look.
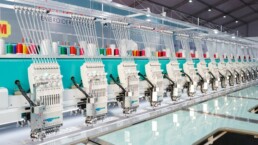
This process might surprise you. After all, when you think of embroidery your mind might automatically go to a grandmother sitting in a rocking chair with her needles. However, this digital method is much more efficient and can produce a high volume of embroidered products at a fast rate. At our production factory, we have multiple machines working at the same time! This is how we can efficiently process many orders.
Embroidery Tips...
Designing a logo for embroidery requires careful attention to detail, as the final product will be stitched onto fabric. Here are some tips to keep in mind.
- Keep it simple: Embroidery works best with simple designs that are easy to replicate with stitches. Avoid intricate details and keep the design clean and minimalistic.
- Consider colour and contrast: Make sure the colours you choose are high contrast and will stand out against the fabric. Avoid using colours that are too similar, as they can be difficult to distinguish once embroidered.
- Use readable fonts: If your logo includes text, choose a readable font that will be easy to embroider. Avoid using script or cursive fonts, as they can be difficult to read once embroidered.
- Keep size in mind: Consider the size of the logo when designing it. A good example is left chest logos; remember the typical left chest logo is between 8cm-10cm wide, so small detail and text should be made as bold/big as possible.
- Avoid fades/gradients: Embroidery detail is limited to what can be produced by a thread. Although threads can be graduated together it causes many layers of thread and is recommended to be solid colours instead of fades.
By keeping these tips in mind, you can create a logo that will look great on your chosen item.


The Bottom Line
Whether you want embroidered aprons for your bakery or hats for your baseball team, this decoration method adds a stylish touch to any occasion.
Related Posts

New Year, New Uniforms: Elevate Your Brand in 2025
When you are alone for days or weeks at…

Branded Polos in Business & Sports
When you are alone for days or weeks at…

Branded Hats
When you are alone for days or weeks at…